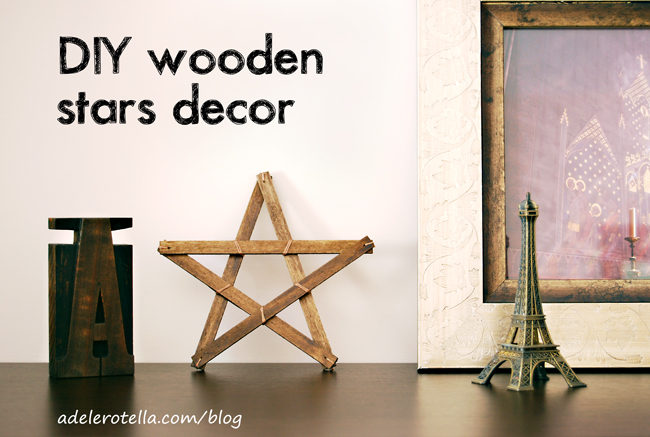
 Finalmente ho avuto il tempo di provare a realizzare queste stelle decorative in legno: le avevo viste sul blog di Minni www.nimidesign.com e subito me ne sono innamorata!
Se anche a voi va di provarci seguite questo tutorial, sono solo 4 semplici passaggi!
Prima però vorrei farvi porre l’attenzione sulla scelta della vernice: io ho scelto un impregnante color noce ma voi potete scegliere altri colori. Il mio consiglio è di controllare che siano a base d’acqua così da poter lavare i pennelli, e soprattutto le mani, con semplice acqua calda. Inoltre non sarete costretti ad inalare sostanze tossiche mentre lavorate.
Prima di procedere alla verniciatura, però, ricordatevi di proteggere le superfici su cui lavorate, ad esempio con un telo di plastica e dei fogli di giornale.
Finally I found time to make these wooden stars decor a shot: I saw them on Minni’s blog www.nimidesign.com and immediately I was enthusiastic of.
If you want try, let follow this tutorial composed of 4 easy steps!
First of all, pay attention to the choice of the paint: I choose a preservative wood stain, nut colour, but you could decide for other colours. My advice is to choose a water-based paint, in order to wash hands and brushes with hot water. Moreover you are going to be sure to work without inhale harmful substance.
In addition to this, pay attention to protect surfaces, for example with a plastic sheet and some print papers.
OCCORRENTE:
- bastoncini in legno
- vernice per legno
- pennello
- carta abrasiva
- ago da lana
- cotone o spago (io matassina per punto a croce)
- riga
- matita
- forbici
TEMPO: 3 ore, più il tempo di asciugatura della vernice
STUFF:
- wooden sticks
- wood paint
- brush
- glass paper
- wool needle
- cotton yarn or twine
- ruler
- pencil
- scissors
TIME: 3 hours, plus drying time of the paint
PROCEDIMENTO
1. Ho ottenuto questi bastoncini tagliando delle stecche in balsa di 50cm: con una matita ho fatto un segnetto ogni 16 cm e tagliato direttamente con le forbici. In alternativa potete usare i bastoncini da gelato, che si trovano facilmente nelle cartolerie o nei negozi di bricolage.
HOW TO
1. I made these little sticks cutting 50cm long balsa sticks: I marked with a pencil every 16cm and I cut off with scissors. As an alternative you can use ice-cream sticks, that are available in every stationery store or bricolage shop.
2. Con l’ago da lana ho effettuato un forellino ad ogni estremità, a circa 5mm dal bordo. Se il legno delle vostre stecche è più duro potete servirvi di un piccolo chiodo ed un martello ma ricordatevi di interporre un giornale per proteggere il vostro tavolo da lavoro. Carteggiate i bordi e tutte le asperità.
2. I pierced sticks by the wool needle, at 5mm to the end. If your wood is harder you could try with a small nail and a hammer but always using a print paper to safe the table. You have to sand all asperities.
3. Ho mescolato la mia vernice e ne ho prelevato alcuni cucchiai ma se il vostro barattolo è più piccolo potete prelevarla direttamente con il pennello. Ho passato un velo di vernice prima sui bordi e poi su una delle due superfici di ogni stecca, infine l’ho appoggiata su carta da giornale. Passate due ore (il tempo di asciugatura è indicato sul vostro barattolo di vernice) ho verniciato anche il retro ma voi potete decidere di omettere questo passaggio.
3. I blended the paint and I took away some spoons, but if your can is smaller you should took it by brush. I painted the edges and one of the surfaces with a thin coat, then I placed them on print paper. After two hours (time depends on your paint) I painted also the back, but you may avoid this step.
4. Ho disposto i bastoncini a formare una stella e ho fissato la forma con ago e filo, passando per i forellini fatti in precedenza. Infine ho rinforzato la stella utilizzando altro filo negli incroci delle stecche.
4. I formed a star with sticks and I fixed the shape with needle and thread, using those little holes ready-made. At least I reinforced the star using further thread in the intersection points.
Io le trovo deliziose, perfette per un interno vintage, rustic, shabby (ahahahahha!) e per casa mia! Magari potete pensare di realizzarne in diversi colori e avrete delle piccole creazioni originali per decorare la cameretta dei vostri bambini.
These stars are gorgeous, perfect for a vintage, rustic, shabby (ahahahahha!) interior and for my home of course!
And if you make them in different colours you’ll have little original creations to decorate your kids room.
Fatemi sapere cosa ne pensate e, se provate a farle, non dimenticate di farmi vedere il risultato!
Please let me know your opinion and, if you try and do, don’t forget to share the outcome!


